Just gather necessarys, prioritize items by need, and pack water, food, first aid, clothing, and documents so you can leave quickly and confidently.
Primary Types of Emergency Go Bags
You should choose among individual, family, vehicle, workplace, and pet go bags to match likely scenarios. After you select the type, prioritize tailored gear and easy access.
- Individual 72-hour kit for solo survival
- Family go bag for multiple household members
- Vehicle-specific evacuation pack for road incidents
- Workplace/office kit for on-site emergencies
- Pet and medical packs for animals and special needs
| Individual 72-Hour | Solo survival: water, food, first aid |
| Family Go Bag | Multiple people: extra supplies, kid items |
| Vehicle-Specific Evacuation Packs | Road tools, warm layers, quick-access gear |
| Workplace/Office Kit | On-site shelter, tools, communication items |
| Pet/Medical Pack | Pet food, meds, prescriptions, carriers |
Individual 72-Hour Survival Kits
Pack a 72-hour kit with water, nonperishable food, a first-aid kit, copies of IDs, and basic tools so you can sustain yourself until help arrives.
Vehicle-Specific Evacuation Packs
Keep a vehicle pack with roadside tools, jumper cables, a small fire extinguisher, blankets, water, and high-energy snacks so you can handle short-term roadside emergencies.
Store your vehicle pack within easy reach-under a seat or secured in the trunk-and fasten loose items to prevent shifting; check and rotate water, food, batteries, and medications regularly, add a compact air compressor, tow strap, reflective vest, flashlight, and a portable power bank, and include pet supplies if you travel with animals so you stay prepared for varied road conditions.
Critical Factors for Gear Selection
You prioritize multi-use items, weight, durability, and maintenance when choosing gear; test and rotate supplies regularly. You balance immediate needs against portability and medical requirements. Any pack must favor items you can use confidently under stress.
- Weight and bulk
- Versatility and multi-use
- Durability and maintenance
- Shelf life and consumables
- Ease of access and operation
Environmental and Climate Considerations
Account for local climate, seasonal extremes, and likely hazards when selecting clothing, shelter, and water management; pack layers, sun or cold protection, and weatherproofing suited to expected conditions.
Capacity and Load Management
Pack to a comfortable weight, aiming for roughly 20-25% of your body weight; prioritize vitals and distribute weight to reduce fatigue on long carries.
Balance load distribution between hips and shoulders, test your pack on short trips to set a practical carry time, use compression straps to stabilize contents, keep heavy items near your center of gravity, and place frequently used gear in accessible pockets so you avoid unpacking under stress.
Pros and Cons of Custom vs. Retail Kits
Retail kits save prep time and offer predictable contents, but you may find unnecessary items and mismatched sizes; you should compare cost, shelf life, and whether the included tools meet your personal medical or mobility needs.
Pros and Cons
| Custom Kits | Retail Kits |
|---|---|
| Tailored contents to your needs | Standardized contents for general use |
| You choose trusted brands | Manufacturer-selected brands |
| Matches allergies and prescriptions | May include unnecessary or unusable items |
| Control over weight and size | Fixed weight and configuration |
| Can be cost-effective over time | Convenient one-time purchase |
| Requires time and knowledge to assemble | Ready to use immediately |
Evaluating Pre-Assembled Reliability
Preassembled kits vary in quality; you should verify expiration dates, test basic tools, and confirm contents align with allergies or prescriptions before relying on them.
Advantages of Personalized Equipment
Custom gear lets you include specific medications, preferred brands, and comfort items so you can respond to your needs more effectively during an emergency.
You can design your bag around likely scenarios-short evacuations, extended outages, or medical events-choosing calorie-dense food, appropriate shelter, and spare prescriptions, while trimming nonimperative items; training with the exact tools you pack and rotating supplies on a schedule keeps the kit practical and ready when you need it.
Step-by-Step Assembly Instructions
| Step | Action |
|---|---|
You should follow a clear sequence: list needs, gather items, test gear, pack methodically, and label compartments so your go bag stays ready and simple to update. | |
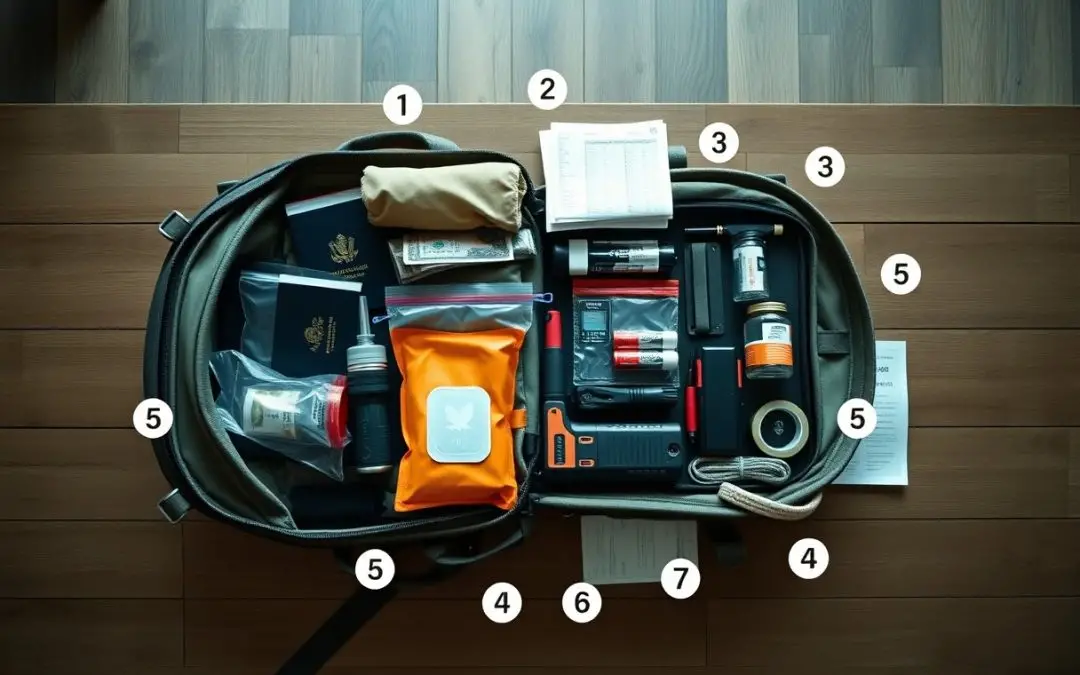
Categorizing Essential Survival Supplies
Group your items into water, food, shelter, first aid, tools, and documents so you can locate necessities quickly under stress; mark compartments and keep backups of high-use items.
Efficient Packing and Weight Distribution
Pack heavier items close to your spine and centered near the hip belt, place frequently used gear in external pockets, and avoid top‑heavy arrangements that pull you backward.
Balance loads by keeping dense items like water, cook sets, and a compact shelter near your back and above the hip belt so your hips carry the weight; place soft or bulky items higher and lighter ones toward the bottom. Use compression straps and modular pouches to prevent shifting, test the pack on short walks, and tweak strap tension and contents until movement feels secure and comfortable.
Expert Tips for Long-Term Maintenance
Maintain your go bag with scheduled checks and clear labeling to avoid surprises.
- Rotate perishables
- Check batteries
- Update documents
Recognizing the few minutes you invest preserves readiness and reduces downtime.
Routine Inventory Rotation Schedules
Schedule rotation every 3-6 months for food and medicine; tag expiry dates and log changes so you can swap items before they expire.
Testing Equipment in Controlled Scenarios
Run brief drills simulating common scenarios to confirm gear functions and your familiarity; note failures and replace or repair faulty items promptly.
Practice by creating specific scenarios (power outage, evacuation, injury), timing tasks, testing communication devices, and using backup power; record results, assign fixes, and keep spares so failures don’t surprise you during an actual event.
Conclusion
Following this, you assemble a compact, prioritized go bag with water, food, first-aid, communication, shelter, and documents; you regularly review, personalize, and practice using contents so you can respond quickly and confidently during emergencies.