
There’s a practical method you can use to assemble a go bag that actually works when time is short and stress is high; prioritize crucials-water, first aid, shelter, communication, and documents-tailor contents to your health, climate, and mobility, test and rotate supplies regularly, and pack for at least 72 hours with multifunctional tools and clear organization so you can grab your bag and move without scrambling.
Emergency situations force you to act quickly, so your go bag must balance vitals, portability and durability; this guide shows how to choose items, pack efficiently, tailor contents to your needs, and maintain readiness so you can move with confidence and sustain yourself until help arrives.

Understanding the Importance of a Go Bag
When an emergency cuts off services, your go bag becomes the difference between manageable discomfort and real danger. Design it to cover 72 hours: 1 gallon of water per person per day, three days of nonperishable food, a compact first-aid kit, a hand-crank or battery radio, spare phone power, copies of IDs and cash. Prioritize items you can use immediately and practice grabbing the bag in under 60 seconds so it actually gets out the door.
Assessing Your Personal Needs
Inventory what makes you unique: prescription meds (carry at least a week’s supply and a copy of dosages), EpiPens, insulin cold packs, spare glasses, hearing-aid batteries, infant formula, and pet supplies. Account for family size-add 1 gallon of water per person per day-and mobility needs like a lightweight cane or extra battery for a scooter. Balance necessities against pack weight; aim to keep the bag portable so you can carry it for miles if needed.
Identifying Potential Emergencies
Map local hazards-earthquakes, floods, hurricanes, wildfires, severe winter storms, industrial accidents-and adjust contents accordingly. Coastal residents should add life jackets and a quick evacuation checklist; wildfire zones need N95 masks and goggles for smoke. Expect to be self-sufficient for at least 72 hours, and plan for evacuations that can require departure in less than 24 hours during fast-moving events.
Use authoritative sources-FEMA flood maps, NOAA forecasts, and your county emergency plan-to assess likelihood and lead times. Run two evacuation drills a year, subscribe to local alert systems, and identify three escape routes from home and work. Factor typical outage durations and transportation limits so your food, water (1 gal/day/person), fuel, and shelter choices match realistic timelines for likely scenarios.
Understanding the Importance of a Go Bag
You often have only minutes to evacuate; a compact, organized go bag gives you crucials when infrastructure fails. FEMA and the Red Cross recommend a 72-hour kit, and you should plan for 3 liters of water per person per day, basic first aid, and layered clothing for temperature shifts. Past events show people without medications, IDs, or cash face longer recoveries, so packing prescriptions, copies of documents, and small-denomination bills streamlines your first 72 hours.
The Role of Preparedness in Crisis Situations
When you prepare ahead, you reduce chaos and speed decision-making under stress. Agencies advise keeping critical items accessible-a charged power bank, paper maps, laminated emergency contacts, and local currency. Simple measures like a family evacuation drill can cut exit time from hours to minutes; aim to rehearse routes and bag retrieval every six months so procedures and contents stay familiar.
Assessing Personal Needs and Risks
Assess your unique risks by listing hazards typical to your location-earthquake, flood, wildfire-and match gear accordingly: heavy boots and a gas shut-off wrench for quakes; waterproof storage and water purification for floods; N95 masks for smoke. Factor household specifics: infants, chronic prescriptions, mobility aids, or service animals alter both contents and pack weight. Use a 72-hour baseline, but plan for 7 days of medications when feasible.
Create a precise personal inventory: medication names, dosages, prescriber contacts, spare glasses prescription, hearing-aid batteries, and allergy alerts; store encrypted digital copies and waterproof physical documents. Add pet vaccination records, three days of pet food and a leash, plus infant formula and diapers if needed. Also map two evacuation routes, note nearby shelters, and assign family roles-who grabs the bag, who collects pets-to shave crucial minutes during an actual evacuation.
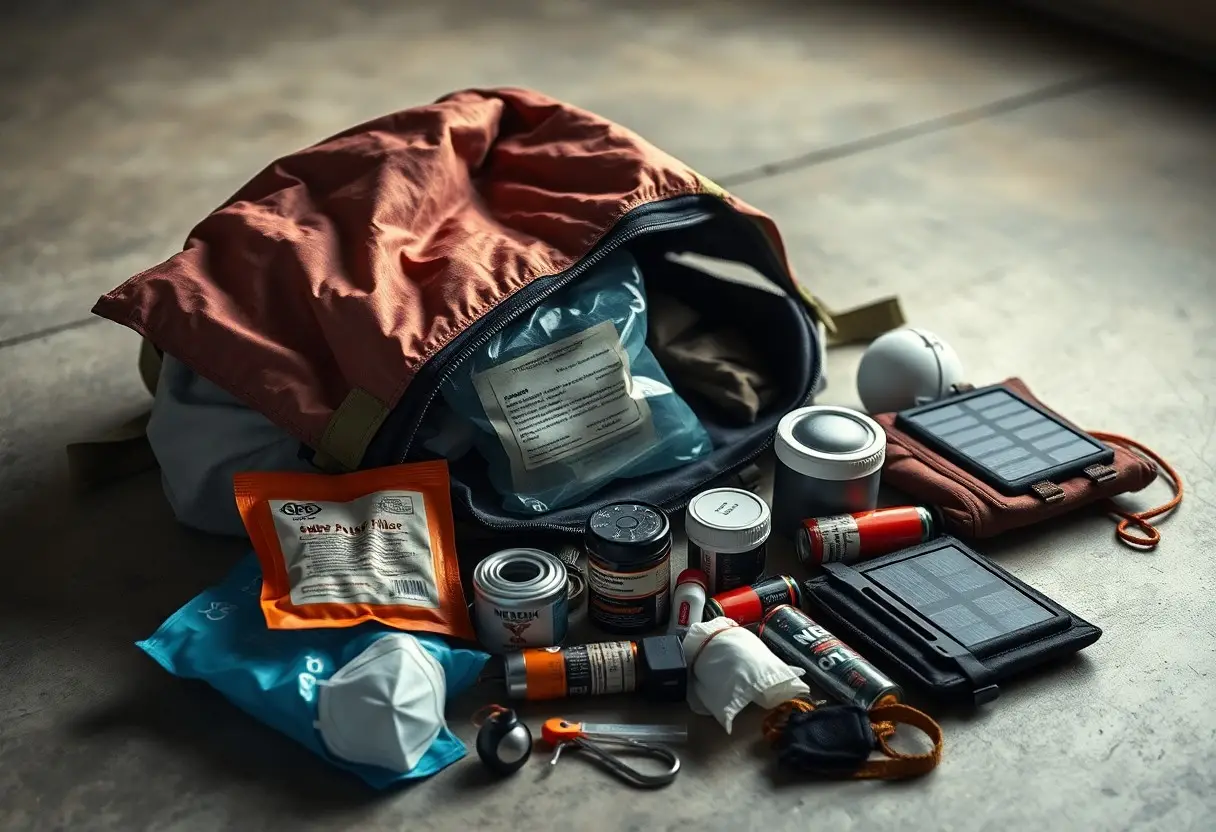
Essential Components of a Go Bag
Begin with items that keep you alive and mobile for 72 hours: water (at least 3 liters per person per day), nonperishable food for three days (energy bars, MREs), reliable shelter (emergency blanket, lightweight tarp), layered clothing, and hardened documents (ID, insurance, prescription list) in a waterproof pouch. Add a small amount of cash-$100 in mixed bills-and copies of keys and local maps; prioritize compact, multi-use gear that balances weight and accessibility.
Basic Survival Gear
You should include a 500-lumen headlamp plus spare batteries, a quality multitool or fixed blade, a Sawyer Mini or similar filter, and a 1-2 liter collapsible water bottle. Add 10-30 meters of paracord, a ferrocerium firestarter, stormproof matches in a waterproof case, and a 1.5×2 meter tarp for shelter. Choose gear that fits your bag and test each item during a weekend drill to confirm usability under stress.
Health and Safety Supplies
Pack a compact first-aid kit with bandages, adhesive tape, sterile gauze, tweezers, and antibiotic ointment; include over-the-counter pain relievers, antihistamines, anti-diarrheal meds, and a 7-day supply of any prescriptions in labeled containers. Add two N95 masks, hand sanitizer (60%+ alcohol), nitrile gloves (4 pairs), and a CPR face shield. Store items in a waterproof pouch and rotate meds every six months.
Include prescription information-generic names, dosages, and refill contacts-alongside printed medical history and allergy alerts. For supplies, aim for 20-30 adhesive strips, three 4×4 sterile gauze pads, two triangular bandages, sterile eyewash (250 ml), and an instant cold pack. If you have asthma or severe allergies, pack an inhaler and at least one epinephrine auto-injector; check expiration dates quarterly and note storage temperature requirements for meds.
Essential Components of a Go Bag
Organize items into water, food, shelter, medical, and tools so you can grab what you need in seconds; plan for a 72-hour baseline per person. You should include one gallon of water per person per day, a compact filtration option like a Sawyer Mini, and calorie-dense ready-to-eat meals (MREs or meal bars) plus basic shelter and first-aid supplies tailored to any special needs.
Water and Food Supplies
You should pack one gallon of water per person per day for at least three days, add a collapsible 1-2L bottle and a portable filter (LifeStraw or Sawyer Mini) for longer disruptions. Include 2-3 MREs or 6-9 energy bars per person, a small can opener, electrolyte packets, and a compact stove with fuel tabs if you expect to heat food.
Emergency Tools and Equipment
You should include a quality multi-tool, a fixed-blade knife, and a 300-500 lumen headlamp or flashlight with spare batteries; add a hand-crank or solar NOAA radio, whistle, ferro rod firestarter, and 50 feet of paracord. Pack waterproof matches, a roll of duct tape, N95 masks, and nitrile gloves for smoke or contamination scenarios.
Also balance weight and utility: choose an LED headlamp to free your hands for tasks, a compact full-tang knife for shelter and food prep, and a 10,000-20,000 mAh power bank with USB-C for device charging; include a small foldable solar panel if you stay off-grid longer. You should test equipment quarterly, rotate batteries and fuel, and practice using the radio, firesteel, and multi-tool so you can operate them under stress.
Choosing the Right Container
Choose a container that matches your likely escape route and how far you’ll carry it: a 20-35 L daypack works for most 72-hour bags, while families may need 60-100 L or separate packs per person. You want something that keeps weight under ~10-15 kg when fully loaded, fits basic gear (food, water, shelter, first-aid), and lets you move quickly on foot for several hours without fatigue.
Size and Durability Considerations
Opt for materials like 500-1000D Cordura or ballistic nylon and YKK zippers for abrasion resistance; hard cases such as Pelican-style boxes offer IP67-level protection for electronics. For a solo 72-hour kit, choose 20-35 L; add 10-20 L per child or pet. If you expect heavy weather, pair a water-resistant pack with internal dry bags or choose a welded-seam PVC duffel for guaranteed waterproofing.
Practical Features to Look For
Prioritize padded shoulder straps and a hip belt to distribute 10-15 kg loads, plus a hydration sleeve sized for 2-3 L bladders. Look for MOLLE webbing, compression straps, quick-access pockets for first-aid and phone, and lockable zippers. External attachment points and an admin panel make it easy to reach imperatives during evacuations without unpacking the whole bag.
Organize using 1-5 L dry bags and small modular pouches: keep meds and documents in a 1 L waterproof pouch, clothing in a 5-10 L dry sack, and food in a separate 3-5 L bag. Test your setup by carrying the loaded bag for a 20-30 minute walk to confirm fit and adjust strap tension, then swap or trim items until weight sits comfortably on your hips and you can access critical gear within 5-10 seconds.
Packing Strategies for Efficiency
Start by triaging gear into immediate, short-term, and bulk categories so your 72-hour core stays light and reachable; aim for a total pack weight under 20% of your body weight and use compression sacks to shave volume. You should favor multipurpose items and a modular layout-wet/dry bags, a small first-aid kit, and a compact shelter (500-900 g) kept separately-so you can grab necessarys in under a minute while heavier supplies ride lower in the pack.
Prioritizing Lightweight and Compact Items
Choose gear with high utility-to-weight ratios: a 200 g ultralight shelter, 10-ounce water filter, and a 150 g multi-tool beat redundant single-use items. You should replace bulky canned food with dehydrated 72-hour rations and swap heavy metal cookware for titanium pieces; every 100 g saved lets you add a spare battery or extra water, and manufacturers’ specs (weight, packed volume) help you compare gear objectively.
Organizing for Quick Access
Place the items you need in the first 10-15 seconds-phone charger, flashlight, whistle, medications-in top or external pockets using color-coded pouches (meds red, water blue) and clear zip bags so you can see contents at a glance. You should practice one-minute drills: in exercises, teams using labeled pouches located critical meds and tools 30-40% faster than unorganized groups.
For added speed, map your pack layout on paper and tape a mini checklist inside the lid so you can audit under stress; keep a dedicated “exit” pouch with ID, cash, keys, and a small map that you can grab and go. You should also staple a repair kit (duct tape strip, safety pins) to the pouch and use elastic retention straps for items like a pen or lighter to prevent rattling and maintain exact placement after repeated use.
Packing Smart: Strategies for Efficient Use of Space
To maximize a 20-35 L pack, treat volume like a budget: prioritize high-value items, compress what’s bulky, and eliminate duplicates. You can reduce clothing bulk by up to 50% with compression sacks, store water purification and a 1-2 L foldable bottle before food, and use small labeled pouches for quick access. Aim to keep the bag balanced and under a weight target so you can move fast if you must.
Prioritizing Essential Items
When packing for 24-72 hours, rank items by immediate survival value: water (1-2 L per day or a purifier), a basic medical kit (tourniquet, 4-6 bandages, antiseptic), shelter/insulation (mylar bivvy or compact sleeping bag), fire/light (200-300 lumen headlamp plus spare batteries), and high-calorie food (300-500 kcal bars). Keep one change of socks and a lightweight rain layer; those small items have outsized impact on mobility and morale.
Utilizing Packing Techniques
Use packing cubes, compression sacks and resealable bags to organize and shrink contents; rolling clothes can cut volume by about 20-30% for some fabrics. Place heavy items close to your spine and mid-back, put frequently used items in external pockets, and stash odd-shaped gear (boots, fuel can) in dead spaces. Modular pouches let you swap kits without unpacking the whole bag.
Also, build modular kits (med, hygiene, electronics) in 1-2 L waterproof pouches and label them; you should be able to pull a pouch in under 30 seconds. Seal small items in clear zip bags to prevent leakage, use carabiners or MOLLE attachment for bulky tools, and practice packing/unpacking to shave minutes-aim to load your go bag in under five minutes and keep total weight near or below 10 kg (22 lb) for most people.
Customizing Your Go Bag
Adapt gear to your likely scenarios: urban blackout, wildfire evacuation, or flood. Include examples: swap a heavy sleeping bag for an emergency bivvy if you’ll be in a car; add a particulate respirator if wildfire smoke is likely; carry two pairs of socks and a lightweight insulated layer for cold nights. Label compartments and keep a checklist in a waterproof sleeve, rotating items seasonally and after drills.
Tailoring to Personal Requirements
Assess your medical and mobility needs and pack accordingly: a 7‑day supply of prescription meds, spare glasses, two sets of hearing‑aid batteries, and pediatric dosing syringes if applicable. You should include printed prescriptions and an emergency contact card. If you use mobility aids, add a compact repair kit and a lightweight folding cane. Practice packing within 10 minutes to confirm you can carry the load.
Considering Family and Pets
If you’re packing for family, aim for a bag per person or use labeled organizers; you should include 72 hours of food and at least 9 liters of water per person (3 L/day), age‑appropriate meds, 12 diapers, one week’s concentrated formula, and a familiar comfort item for children. For pets, pack 3 days of food, a collapsible bowl, leash, carrier, vaccination records, and a recent photo.
Plan logistics: map meeting points and assign roles-one adult holds family papers, another carries meds. If you have small children, place quick‑access snacks and distraction toys within reach and pack extra clothing in a waterproof bag. For pets, rehearse carrier and leash routines so your animal tolerates them under stress; store pet meds in a clear labeled pouch and keep vaccination and microchip info both physical and on your phone.
Regular Maintenance and Updates of Your Go Bag
Set a calendar reminder to inspect your bag every three to six months and perform a full inventory twice a year. Swap water on a 12‑month cycle, rotate canned food and MREs based on manufacturer dates (2-5 years), and test electronics and batteries quarterly. Label items with purchase or expiry month/year and keep a simple paper inventory inside the pack.
Checking Expiry Dates
Scan medications and first‑aid items monthly and replace any expiring within six months; consult a pharmacist for unused prescriptions. Treat batteries like consumables-replace alkaline every 2-4 years or sooner if stored in devices. Rotate water and high‑moisture foods annually, and mark lot numbers and expiry dates on a visible tag so you avoid surprises during an event.
Adapting to Changing Needs
When your household changes-new baby, aging parent, pet, or a move-update contents immediately: add infant formula and three days of diapers per baby, a week’s worth of pet food and meds for animals, or mobility aids like a lightweight folding cane and spare prescription glasses. Scale supplies from a 72‑hour core to a 7‑day kit if your risk profile grows.
Keep a digital inventory (Google Sheet or phone notes) with photos, quantities, and expiry dates, and set calendar reminders for replacements. Run a simple quarterly checklist: verify medication refills, test stoves and headlamps, and swap seasonal clothing. If wildfire or flood risk rises, add two N95 masks per person per week of exposure and water‑purification tablets (roughly 10 per person per week) to match the new threat profile.
Maintenance and Updates
Schedule a biannual audit of your bag: every six months you should run a quick inventory, test electronics, swap batteries, and replace perishable food and water. Use a one-page inventory inside the lid with purchase or expiry dates, and log changes on your phone or a paper backup. After storms or moves, do an immediate check. Aim to keep overall pack weight manageable – target under 20% of your body weight for long carries.
Regularly Checking Expiration Dates
Set calendar alerts to inspect expirations every three to six months. Replace epinephrine auto-injectors 12-18 months before they expire, rotate bottled water every 1-2 years, and treat MREs and freeze-dried meals as 3-25 year items depending on storage temperature (MREs degrade faster above 75°F). Swap OTC meds annually and discard leaking batteries immediately. Keep dates written on caps or in an app so you can act quickly.
Adapting to Changing Circumstances
When your life changes, update your bag: add prenatal supplies if you’re expecting, extra diapers and formula for infants, or pet food and a leash for animals. Moving to a coastal zone calls for salt-resistant tools and a NOAA radio; relocating inland suggests more water and shade. After a job change or evacuation route change, store copies of IDs and at least $200 in small bills. Review after any major event.
Use a trigger checklist to guide updates: new prescriptions, household members, climate shifts, or new local hazards (flood, wildfire, tornado). You should keep 72 hours of tailored meds, 48 hours of infant supplies, and 3-5 N95 masks per person for smoke events. Maintain a compact digital inventory (photo + dates) and a paper copy in your pack. After drills or real incidents, note what you used and replace or improve those items immediately.
Tips for Personalizing Your Go Bag
Personalize by adding clear ID, a one-page medical and medication list, size-specific clothing, and a prioritized “grab first” pouch so you can act fast; use waterproof sleeves for documents and two copies of necessary papers. Color-code pouches and date-label perishables every six months, keep $50-200 cash in small bills, and balance weight so you can comfortably carry the pack for 3-6 hours.
- Label each pouch with contents and date; store critical items in clear zip bags for immediate visibility.
- Carry duplicates of mission-critical gear-an extra phone cable, compact headlamp, two spare batteries, and a small multitool.
- Any spare items (backup glasses, extra prescription meds, duplicate keys) should be split between your bag and on-person storage to avoid single-point loss.
Adding Comfort Items
Small comforts lower stress and improve endurance: pack a 12″x12″ fleece or mylar blanket, foam earplugs, a compact inflatable pillow, two lightweight snack bars (200-250 kcal each), and a 500 ml collapsible water bottle; you can also add a tiny familiar item-a child’s small stuffed toy or a scented cloth-to calm family members during evacuation.
Tailoring to Family or Pet Needs
For children include 2-3 clothing changes, age-appropriate snacks, and 8 diapers per infant per day; for older adults pack a 7-day medication list, pill organizer, and mobility aids; for pets bring 3-7 days of food, a leash, collapsible bowl, waste bags, and photocopies of vaccination records so shelters accept you more easily.
Example: if you evacuate with a toddler and a 20 lb dog, plan for ~24 diapers for three days, two jars of formula or 3-4 ready-to-feed bottles if needed, and about 0.3-0.5 lb of dog food per day (store in resealable heavy-duty bags). Label all meds with dosing instructions, include written emergency contacts for each family member and pet, and keep a photo of you with the pet for reunification.
Tips for Effective Use
When seconds count, keep your plan simple: pre-assign roles so you know who grabs water, who secures documents, and who carries the bag; practice the 30-second grab-and-go until you can exit your front door in under a minute while carrying the pack. Check expiration dates and swap perishable items every six months, and color-code pockets for meds and documents to speed retrieval.
- Run a 60-second grab-and-go drill monthly to test readiness.
- Store photocopies of IDs and insurance in a waterproof sleeve and a cloud folder you can access.
- Label pockets with contents and dates; use a bright ribbon or carabiner for quick identification.
Recognizing how stress slows hand movements, you should practice retrieving keys, meds, and documents while wearing gloves or under time pressure to build reliable muscle memory.
Practice Makes Perfect
You should run a full go-bag drill quarterly: pack the bag, exit, and walk 500-2,000 meters with it to test comfort and weight distribution; time each run and aim to improve by 10-20% over three sessions. Involve family or teammates, rehearse switching carriers, and simulate common obstacles like stairs or narrow hallways to ensure everyone can handle assigned loads.
Staying Informed About Local Emergencies
You should subscribe to your county’s reverse-911, enable Wireless Emergency Alerts on your phone, and install the FEMA and local police apps; add a battery-powered NOAA Weather Radio with SAME to your bag. Check that you can receive alerts even with low signal-SMS, cell broadcast, and FM radio often reach where data does not.
Use a three-channel alert strategy: official channels (county SMS, FEMA app), broadcast (NOAA Weather Radio with SAME county codes), and local networks (neighborhood groups or amateur radio); test each monthly, note typical alert lag, and keep a 10,000-20,000 mAh power bank to sustain communications for 24-48 hours.
To wrap up
Presently you consolidate a go bag that actually works by focusing on needs, portability, and redundancy: choose versatile gear, include shelter, hydration, food, first aid, power and copies of documents, and tailor supplies for family members and pets. Test and practice packing, rotate perishables, and keep a checklist so you can deploy quickly and confidently when an emergency arises.
Summing up
On the whole you should assemble a compact, prioritized go bag with imperatives for shelter, water, food, first aid, tools, communication and copies of documents, tailored to your needs and updated regularly; practice using it, store it where you can grab it quickly, and include contingency items for mobility, medications and power so your bag functions reliably when you must evacuate or shelter in place.