There’s a smart way to pack your emergency go bag: prioritize multipurpose items, arrange crucials for quick access, rotate consumables, and balance weight so you can move quickly and stay self-sufficient.
Assessing Environmental and Personal Risks
You should assess local hazards, medical needs, mobility limits and access routes to tailor your go bag contents to likely threats and personal constraints.
Regional Disaster Profiling
Local hazard patterns guide what you pack: earthquakes need heavy tools, floods require waterproofing and elevation items, storms demand power and shelter supplies.
Specialized Needs for Dependents and Pets
Plan for extra medications, mobility aids, formula, diapers, familiar toys and pet carriers so you can maintain care and reduce stress during displacement.
Organize individual kits within your bag: labeled medication pouches with dosages and prescription copies, duplicate contact and medical info, spare eyewear and batteries, feeding supplies and comfort items for children, plus pet vaccination records, extra food, collapsible bowls, leash, waste bags and a familiar blanket to reduce panic and speed recovery.
Hydration and Sustenance Strategy
Water planning sets priorities: pack a liter per person per day, plus purification options and calorie-dense rations for at least 72 hours; organize items for quick access and rotate supplies periodically.
Advanced Water Filtration and Storage
Filter choices should include a compact pump, a gravity filter, and a UV pen; you carry spare cartridges and collapsible bladders to maximize capacity and refill from natural sources.
- Carry spare filter cartridges and a chemical backup (tablets) for redundancy.
- Use both rigid bottles for boiling and collapsible bladders for space-saving storage.
- Store water off the ground and rotate every six months to maintain freshness.
Water & Food Quick Reference
| Item | Tip |
|---|---|
| Pump filter | Fast flow for turbid sources; keep spare seals. |
| Gravity filter | Hands-free for camps; ideal for group use. |
| Collapsible bladder | Saves space when empty; label with fill date. |
| Electrolyte tablets | Restore salts without adding weight or bulk. |
Nutrient-Dense, Low-Weight Emergency Rations
Pack lightweight, calorie-dense foods like nuts, energy bars, and dehydrated meals; you balance calories with shelf life and don’t forget electrolyte supplements for longer events.
Choose mixes and individually portioned packets so you can ration efficiently, rotate stock by expiration date, and include simple high-protein options to preserve strength; you may add a compact stove and minimal fuel if prolonged displacement is likely.
Shelter and Climate Protection
Shelter components in your go bag should include a compact tarp, emergency bivvy, and a lightweight tent; choose gear that packs small, repels water, and ventilates to prevent condensation.
Portable Bedding and Heat Retention Systems
Pack an insulated sleeping pad, a reflective space blanket, and a temperature-rated sleeping bag; add a thin silk liner and chemical hand warmers for extra warmth without bulk.
Durable All-Weather Apparel and Footwear
Choose layered clothing with a breathable base, an insulating mid-layer, and a waterproof outer shell; include durable waterproof boots and several pairs of moisture-wicking socks.
Layering strategy favors merino or synthetic base layers, a fleece or synthetic insulating mid-layer, and a laminated shell with taped seams; you should pack gaiters, a warm hat, waterproof gloves, and an extra pair of boots if space allows. Break in footwear before evacuation and keep clothing in waterproof sacks to maintain dryness.
Communication and Navigation Systems
Pack compact communication and navigation tools you trust: a charged emergency radio with spare batteries, a whistle, a signal mirror, and a power bank to keep phones and radios running.
Off-Grid Signaling and Emergency Radio Gear
Carry hand-crank or battery-operated emergency radios, an LED flare, spare antenna, signal mirror, and high-visibility cloth so you can alert rescuers and transmit basic messages when networks are down.
Topographic Maps and Compass Proficiency
Study paper topographic maps and a dependable compass in waterproof sleeves so you can pinpoint positions, plan routes, and avoid hazards when electronics fail.
Practice reading contour lines, adjusting for magnetic declination, taking bearings, and measuring distance with the map scale so you can orient quickly and make confident route decisions under pressure.
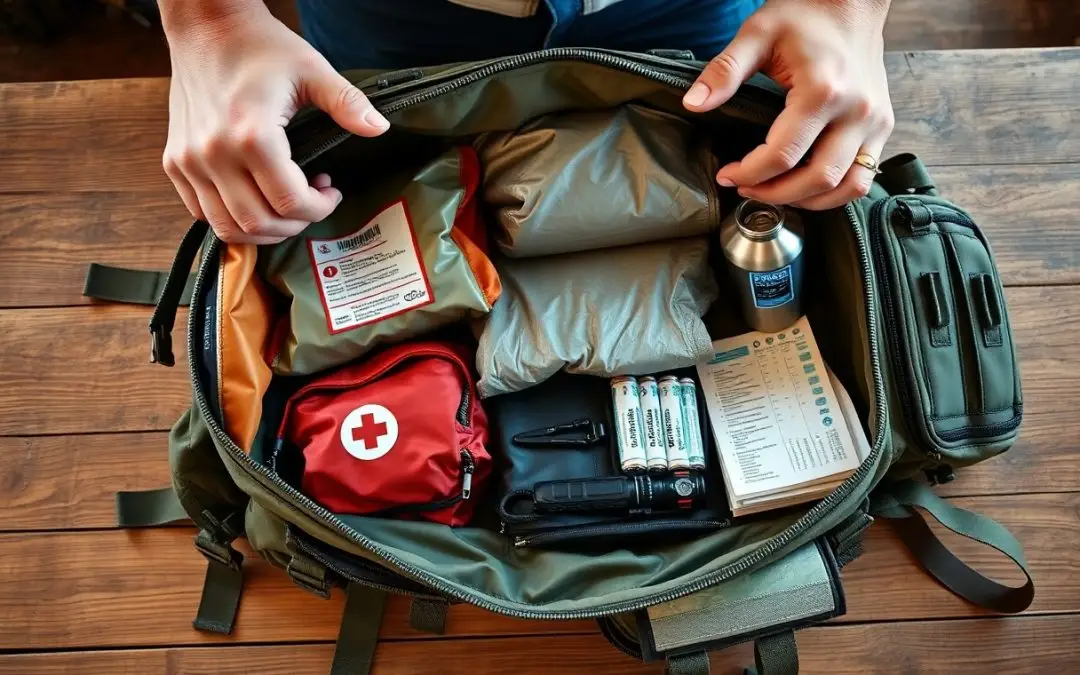
Tactical First Aid and Hygiene
Pack a compact trauma kit, sterile dressings, a tourniquet, hemostatic agent, chest seals, gauze, and nitrile gloves so you can access lifesaving supplies quickly from labeled, waterproof pouches.
Trauma-Focused Medical Kit Assembly
Assemble a trauma kit with a tactical tourniquet, hemostatic dressings, pressure bandages, chest seals, trauma shears, and backup gloves so you can prioritize interventions and retrieve items single-handedly.
Sanitation and Infection Prevention Protocols
Include antiseptic wipes, alcohol pads, hand sanitizer, disposable masks, sterile wound dressings, and sealed biohazard bags so you can prevent cross-contamination and replace supplies after use.
Maintain strict sanitation by isolating used dressings in labeled biohazard bags, sanitizing your hands before and after treatment, and carrying a compact waterless wash. You should be able to irrigate wounds, apply antiseptics, and change dressings aseptically to minimize infection; rehearse these steps during drills so they become second nature.
Advanced Packing and Load Distribution
Pack heavier items close to your spine and low in the bag to keep your center of gravity stable; balance weight between sides and use modular pouches so you can adjust on the move.
- Place daily crucials in top-access pockets for quick reach
- Store emergency tools near the middle for protection and balance
- Reserve sleeping and bulk gear low and centered to stabilize the load
Item Placement Guide
| Item | Suggested Placement |
|---|---|
| Water | Front/top pocket for quick access |
| First aid | Top/inner compartment |
| Shelter/sleeping | Bottom/center to stabilize |
| Tools | Center near spine for protection |
The Tiered Accessibility Method
Layer items by frequency so you keep immediate crucials in outer pockets, mid-use gear in main compartments, and rarely used heavy supplies at the bottom, enabling rapid retrieval without full unpacking.
Ergonomic Weight Optimization Principles
Align heavy loads within two inches of your back and spread weight evenly so you reduce strain; you should adjust straps and load lifters to shift mass onto your hips for steadier, less tiring movement.
Distribute mass so your hips carry the bulk, position dense items centrally and low, and fine-tune shoulder straps, sternum strap, and hip belt so the load transfers to your pelvis; you should rebalance periodically as contents settle.
Conclusion
Considering all points you must pack necessarys, prioritize lightweight multi-use items, check expiration dates, rotate supplies, keep documents and cash accessible, and tailor contents to your personal needs and local risks.